Fall in New England – where would you go?

vermont

Autumn is my favourite time of year, and even now in the heat of summer the occasional crisp, dewy fresh morning makes me convinced I can smell the turn of the seasons on its way.  Hugely exciting for me is that this year we’re planning to travel around New England in October when the colours are at their most vibrant and the pumpkins just right for choosing…

il_fullxfull.326534074

Beyond our flights we have no fixed plans or bookings as yet so our trip is wide open, and I’d love to hear any suggestions or recommendations, be they big (a great route) or small (gotta have coffee at this place..). Events, activities, places to stay ?   Yes please!  The more ideas the better.

By the way, have you come across the amazing site They Draw & Travel? Artists from around the world submit beautifully illustrated maps of towns and cities.  Perfect for a browse if you’re looking to commemorate a special visit or place, or simply want to while away a little time travelling from your desk..

Readsboro-Vermont-by-Nate-Padavick

Images from top:

Watercolour of Vermont via Country living; Map of Maine by Molly Mattin via Etsy; Bike Loop from Readsboro and Pittsfield, MA both by Nate Padavick via They Draw & Travel.

Pittsfield_MA_Nate_Padavick

All Aboard for a Pirate Picnic!

Cambridge Theatre Company

Ahoy there! We’ve had a swashbuckling weekend here, dressing as pirates and polishing off a feast fit for the high seas as we watched the amazing Cambridge Touring Theatre company perform Treasure Island.  Outdoor theatre is definitely one of the highlights of English summertime, and this performance for families was hugely popular.  The chance to dress up, run wild through the local forest and enjoy a massive shared picnic before popcorn and drama was too good to miss.  Our picnic hamper contained;

pirate baguettes
Treasure-map baguettes, packed with child-friendly filings and tied up with decorative maps, bakers twine and wax seals.  The maps were soon torn off and used as real-pretend maps to hunt for treasure amongst the trees.

pirate woodland treasure hunt

Grown-ups took it in turns to scatter chocolate gold coins amongst the tree roots whilst child pirates vaguely covered their eyes, secretly tracking every move.  With the children otherwise engaged, we got stuck into these portable banoffee pies, which I made in jam jars for ease of transport;

portable banoffee pie
I spooned a cheesecake base into the jar and followed with a dollop of ready-made dulce de leche, then scattered  over some banana slices and freshly whipped cream, with a grating of chocolate sprinkles on top. Not the healthiest of desserts but a perfect picnic treat.

portable banoffee

When the pirates returned from their voyage through the forest, we gave each of them a jar of chocolate cannonballs (Maltesers), to see them through the performance…

pirate canonballs
I used these milk bottles and found that a cork (I collect them for random craft projects) is the perfect size to act as a stopper, and gives a suitably nautical touch.  One standard sized pack of Maltesers fills about 2 small milk bottles.

We took along Harry’s homemade cardboard pirate ship (below and here) for the kids to sit in to watch the performance; it’s miraculously survived almost a year of hard play, but a downpour of rain in the interval has definitely shortened its lifespan.

pirate ship tutorial

pirate picnicing pirate outdoor theatre

As all true pirates know, conditions at sea can go from calm sunshine to storms in a heartbeat, and so it was for us, with the heavens opening with a crack of thunder halfway through; the scramble for cover seemed only to add to the adventure and fun (for us; I’m not sure about the actors who bravely carried on regardless.)

The evening has also reawakened Harry’s love of all things piratical; we tend to start the mornings with a bout of bleary-eyed foam sword duelling, and have had to dissuade H from greeting everyone with ‘Ahoy M’hearty!’.  It’s a little startling for the lady at the check-out till when we buy groceries, even if it seems entirely natural at home..

Hope you’re having a lovely weekend!

Kate

How to Stay Cool in a Heatwave

homemade fruit juice ice lollies

We’ve had an unprecedented, glorious 3 weeks of unbroken sunshine here, with soaring temperatures and cloudless skies.  It seems to have sent Britain into a state of national shock, with people shedding clothes at an alarming rate and lying, spread-eagled, on every available patch of grass and scrub to soak up the precious rays.  Relatedly, hospitals report new levels of burns admissions and ‘injuries caused by misuse of poolside inflatables’ (there’s a Bill Bryson-esque post in itself there, I can’t help feeling).

Here, we’ve been rather more careful, and instead have been experimenting with ice-cream and lolly making.  In fact, we’ve frozen pretty much everything we can find in the cupboards these last few days, working out what tastes good and what was better left un-meddled with.  The kitchen has become a sea of brightly-coloured dribbles and splashes, and Harry has been diligently working his way through a variety of lollies, giving each one the lick-test for success or failure.  Here are our biggest successes;

Homemade Fruit Ice Lollies

Homemade Ice lollies

We made these by simply pouring our favourite natural fruit juices into ice-lolly moulds and freezing; simple as that.  No e-numbers, no scary preservatives, and a super-quick ice-lolly that you can even justify eating for breakfast (well, it replaces a glass of juice, right?).  You can, as we did, add a drop of food colouring gel to make them more beautiful – most natural juices are pale amber in colour, so feel free to jazz them up with a dash of the brights.

fruit juice lollies

You can find plastic ice-lolly / popsicle moulds like these in many stores, but if like me you prefer to use wooden sticks instead of the plastic handles and can’t find a mould which fits wooden lolly sticks, you can customise the plastic ones very easily (and it’s a great way of making large numbers in batches for a party).  Two foolproof ways; either cover the top of the filled mould with tin foil and pierce the wooden stick through, or (for the very precise-minded); place a piece of tape across the opening, and another at right angles so that you have a taped cross, and make a small incision at the centre before threading the stick through and down into the juice. If you don’t have special lolly moulds, you can make fill & freeze paper cups or even muffin cases using the foil & stick method – silicon works particularly well.

Our other favourite recipe was frozen yoghurt*…

organic frozen yoghurt pops

I made these in exactly the same way, by simply pouring into moulds, adding sticks and freezing.  As you’d expect, frozen yoghurt pops are much creamier and smoother than juice-based lollies, but seem wonderful immune from drips  – ours were mess-free, albeit they were consumed very quickly..

raspberry frozen yoghurt pops

*Yoghurt or yogurt?  Anything goes apparently, as far as the spelling is concerned; the only thing which is universally agreed is that it tastes divine..

yoghurt lolly

If you’re making batches of these, take the moulds out of the freezer when frozen solid (2-3hrs, we found), and after a couple of minutes ease the lollies out of the moulds.  Wrap each one in freezer paper to avoid them sticking together and place back in the freezer; then simply refill your moulds and start over again.

Are you an ice-cream or ice-pop connoisseur?  Any recipes we should be trying just as soon as we work our way through our current stockpile?

Have a great week.

Kate

A Love Letter to Paris

ParisTraveler_Bicycle_pinup

Well hello, how are you?  I’m back from a few days away with my boys and am feeling refreshed, reinvigorated, renewed and all sorts of other startling words beginning with ‘re’ which provoke mild anxiety in those who know me, who rightly anticipate huge bursts of energy and vigour, just when they are ready to relax and chill out.  Whilst I’m still in holiday mode, I wanted to share the highlights of my recent Paris weekend – a quick visual feast if you have no intention of ever visiting, or possibly a resource to bookmark if you do.  Many of you added comments with some lovely ideas about where to visit which we loved (thank you); the sun shone, the Seine sparkled and we saw the city at its finest, beginning with;

Marais by katescreativespace

A big highlight for me were the endless stores dedicated to all things paper and craft, like this one;

Paris shopping guide by katescreativespace copy

In terms of food, we ate mostly at bistros and cafes, choosing freshly baked bread and pastries from the many patisseries for breakfast, but on our last day we treated ourselves;

Sunday brunch in Paris

We were both keen to try a cookery class when in Paris, so elected to study the art of the macaroon via an afternoon masterclass here

macaroon making by katescreativespace

And finally we squeezed in a couple of hours of window shopping and wandering back through the cobbled streets of the Marais, stumbling across some beautiful boutiques like La Chambre aux Confitures; a tiny place of worship for all things jam and jelly-related (fig, olive & nut jam to accompany your cheese plate, madame? Pas de probleme.  Strawberry & champagne jam for that special breakfast?  Mais oui!).  Then onto the magnificent windows of legendary ballet shop Repetto, piled high with shoes and bustling with young ballerinas eagerly queuing to try on the wares..

repetto store paris

lepetto ballet shoes

A wonderful weekend, and an inspiring one – I spent lots of time photographing amazing window displays and scribbling notes of things to try back home (watch this space..).

But now back to earth, and fortunately in our small corner of the world it’s an earth which is still basking in a heatwave, moderated by overnight showers which bring the garden back to life and cool the air.  It’s proven the perfect conditions for our sunflowers to give a final triumphant push for glory, and as I type they are teetering outside the window (note the carefully chosen words to indicate magnificent height and beanstalk-like prowess; we take competition very seriously…).  Photos and final measuring next time, once I’ve had the chance to add a last dash of plant food under cover of darkness.

Have a wonderful weekend, wherever you are; we have a night of outdoor theatre and picnicking to look forward to – summer at its best!

Kate x

nb all photos and illustrations in this post are my own, apart from the glorious Paris poster (top) from here

DIY Concertina-Fold Photobook

DIY Concertina Photobook Project

When I was in Paris recently, I saw a range of beautiful silk-covered concertina photo albums in the window of a stationery boutique.  A tiny, eclectic paradise stuffed full of the most beautiful things, it was a shrine to all things paper.  Their beauty diminished a little when I saw the price; about 25 Euros, or £20/$35.  Alors!

I resolved to have a go at making a few of my own at home to capture photos  of special days or big events  – and to make and give as gifts, packaged up with a little pack of photo-corners so that recipients can fill them with whatever photos they like.  I made one to go in Harry’s Time Capsule, with a selection of photos reflecting a typical day this summer, so he can look back and remember what it was like to be 3yrs old…

Concertina Photobook DIY folding Photobook
DIY Photobook Then for something a little more grown-up, I found some pretty Paris street map paper and made a concertina book of the best photos from our Paris trip; a copy each for me and my best friend Vicky who came with me…

Paris Concertina Photobook
Parisian Concertina Photobook
DIY Vacation Photobook

All you need for this is a large sheet of black craft paper (or any colour, if you prefer something brighter for the inside), two pieces of cardboard, some spray glue and a sheet of decorative paper.  Oh, and a stack of heavy books to place it under at various stages.  If you’re feeling inspired, click below for the step-by-step directions (and do let me know how you get on!)

DIY Concertina Photobook Instructions (click the link to download and print, or simply view them below)

DIY Concertina Photobook Guide Notes

Strawberry Fields Forever…

No-bake strawberry cheesecake

We’re in the midst of a heatwave here, and it brings with it a huge wave of nostalgia for the long hot summers of my childhood.  I’ve been talking with Harry a lot about the things we used to do – running through sprinklers, building endless sandcastles, forts and dams at the beach, and picking soft fruit at farms along the roadside.  I promised him that we’d work our way through the same list too (and add a few more; because everyone should be allowed to create a new bit of history after all..), so last week we gathered up our hats, sturdy sandals and appetites and went in search of the first of the season’s strawberries…

Strawberry fields PYO

strawberry farm pick your own

the perfect strawberry

We picked and picked (and taste-tested) our way through the field until our punnets were full and our mouths a tell-tale red.  The picking was great fun in itself; the strawberries almost an afterthought.  We carefully transported them home and put them to good use, making no-bake strawberry cheesecake desserts, and then homemade strawberry cheesecake caramel ice-cream with the leftovers.  I promise you that these are both delicious and incredibly simple… give them a whirl;

Strawberry cheesecake recipe from KatesCreativeSpace

Firstly wash, hull and slice your strawberries into halves, then set aside…

chopped strawberries

Empty your biscuits/crackers into a plastic bag and bash with a rolling pin until they are nothing more than crumbs.  To help with this stage, imagine you are whacking a small critter that has shot out from under the cupboard, and needs to be stopped dead in its tracks.  Bash them a bit more.  Now tip into a bowl and pour over your melted butter, and stir well.  Heap spoonfuls of the crumb mixture into the base of 6 cocktail glasses (you can use to fill a standard 23cm baking pan if you’d rather make a single cheesecake).  Place in the fridge to chill.

digestives

Now for the cheesecake filling; blend together the cream cheese and icing sugar, and then scrape the vanilla seeds from the pod and add these in too, blending again.  Pour in the double cream and mix well.  Pour or spoon your mixture over the crumb base in the cocktail glasses (or pie dish), and then leave to set in the fridge for at least a couple of hours.

whisk

Now spoon your strawberries over the top and serve to gasps of admiration and gastronomic lust.  Honestly, trust me on this.  Visually, this is a just a more elegant way of serving a sort of deconstructed European cheesecake (never oven-baked, like those in North America, and thus a slightly sharper, more creamy taste).  You can prepare it ahead of time and whip out at the moment critique, and I’m all for desserts like that…

dessert trio

When I was playing around making these I ended up with more of the cheesecake base than I needed, so I was delighted to stumble across a recipe idea from Waitrose (pic below) for homemade strawberry & cookies ice-cream.  I adapted this and mixed my leftover crumb base with some slightly softened vanilla ice-cream, some chopped strawberries and a dollop of caramel sauce.  Mix it up well and then refreeze, and you have an awesomly more-ish homemade ice cream dish…

homemade strawberry cheesecake ice cream

So there you have it; a fun summer activity and then two divine desserts to make with the treasures you bring home.  Bliss…

And finally… thank you for the lovely comments and kind wishes for our wedding anniversary last week; we had a divinely decadent afternoon in the sunshine at a local hotel, being served a seemingly endless afternoon tea; I’m mildly ashamed to say we drank Assam despite the exotic array of teas on offer…

champagne afternoon tea

But were much more adventurous and dedicated in working our way through the entire dessert selection… champagne tea 2

And now I must go; penance beckons, in the form of a very long (and very slow) run…

Have a great sunshiny weekend when it comes!

Kate

A Painted Romance

DIY watercolour heart

I’ve come over all romantic this week. Perhaps because the week began in Paris, city of lovers, where I had my long-awaited weekend away (more on that later), but probably because tomorrow is our wedding anniversary, and I’m inevitably feeling reflective about the last five amazing, exhilarating years.  To celebrate, we’ll be slinking off to local country-house hotel in the middle of the afternoon  ….to eat lots of cake.

A decadent Afternoon Tea beckons, and whilst it may sound somewhat less glamorous than a passionate mini-break à deux it requires no babysitters or complicated logistics, and very little schedule-juggling & budget. A couple of hours to relax, reconnect and just be, aided by a glass of champagne and enough calories to slow down Usain Bolt. I can’t wait.

DIY watercolour moonMy anniversary card to Mr B will be homemade – of course- and I’ve been dabbling with my watercolour paintbox, creating the images above and below and mostly just playing with colours and shapes, adding text to those I like…

home is where the heart is

In each case I’ve painted a simple shape in a single colour with a loaded, wet paintbrush, so that the paint pools into interesting patterns as it dries.  For those inspired to give it a go, there’s more detail below.

You are my sunshine

I used the same technique to make fun menus when we had friends over for dinner last weekend, painting watery stripes of colour in complementary shades, which blended at the edges as they settled and dried…

painted menus

I decorated the table with garden flowers in a similar palette, and sprayed this log white as a centrepiece.  Tiny tea-light candles in little porcelain cups completed the picture…

Paint palette tablescape

If you love the watercolour effect but would rather cheat than labour away at your own (and I applaud you for this; hurrah for short-cuts..), you can find PDF downloads of my images and the painted menu backdrop at the bottom.  If you’re feeling artistic, whip out your paintbox and read on…

make me smile

Continue reading

Treasure-Hunting…

Ardingly IACF Fair

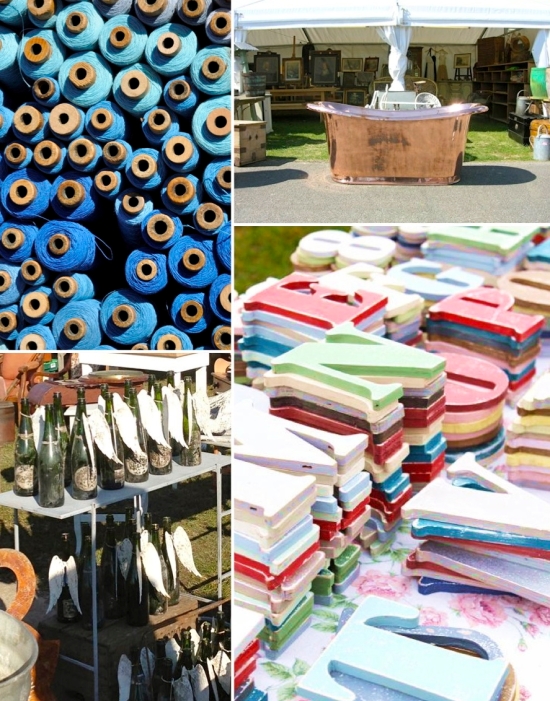
Images above via IACF

One bright day two weeks ago, we piled into the car and headed for Ardingly, which periodically hosts one of Europe’s largest vintage & antiques fairs.  It’s an annual pilgrimage for me; a hunting ground for treasures and improbable, beautiful finds.  We have clearly defined roles; I spot something I adore and then shriek, loudly, before bouncing around distractingly in the background whilst my husband attempts to negotiate the price, and to create an impression of casual interest. Often, I am dispatched for coffee as a way of removing me from sight entirely.

Prices anyway are low; this is predominantly a dealers’ event, and bargains are many. Whether you are looking for a set of tiny vintage patisserie tins, a 20ft high reclaimed, columned stone porch for your country manor or a turn-of-the-century copper bathtub, you will undoubtedly find it here.  Sellers come from all over Europe and it’s as much a reunion as a business event; currencies, embraces and gossip are all freely exchanged and there’s a festive air.

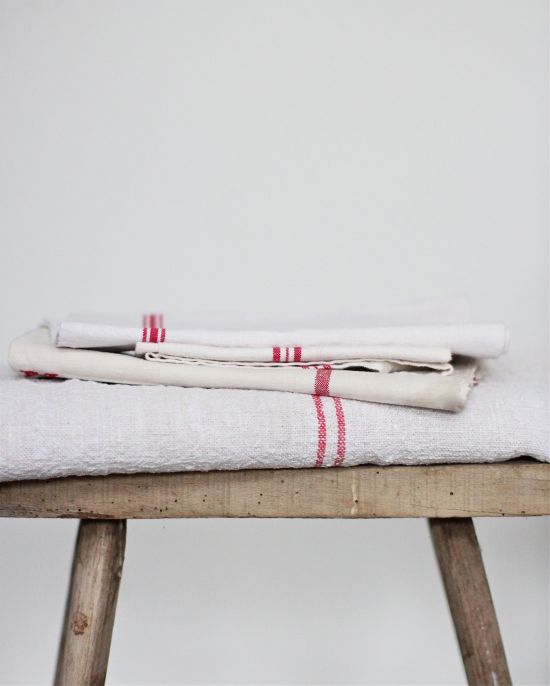
I gave myself a strict budget of £100 and went rummaging.  Here’s what I bought;  firstly, an armful of vintage French linens; monogrammed tea-towls and a long, hand-woven length of heavy linen which will work beautifully as a rustic table runner.  They’re perched on a £5 old milking stool, which will make a lovely bedside book table once I check that the woodworm, too, is definitely vintage…

vintage french linens

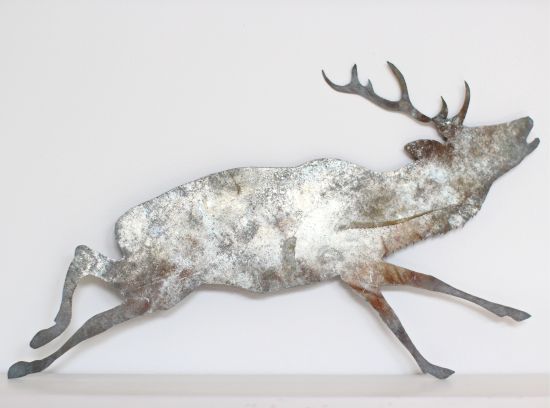
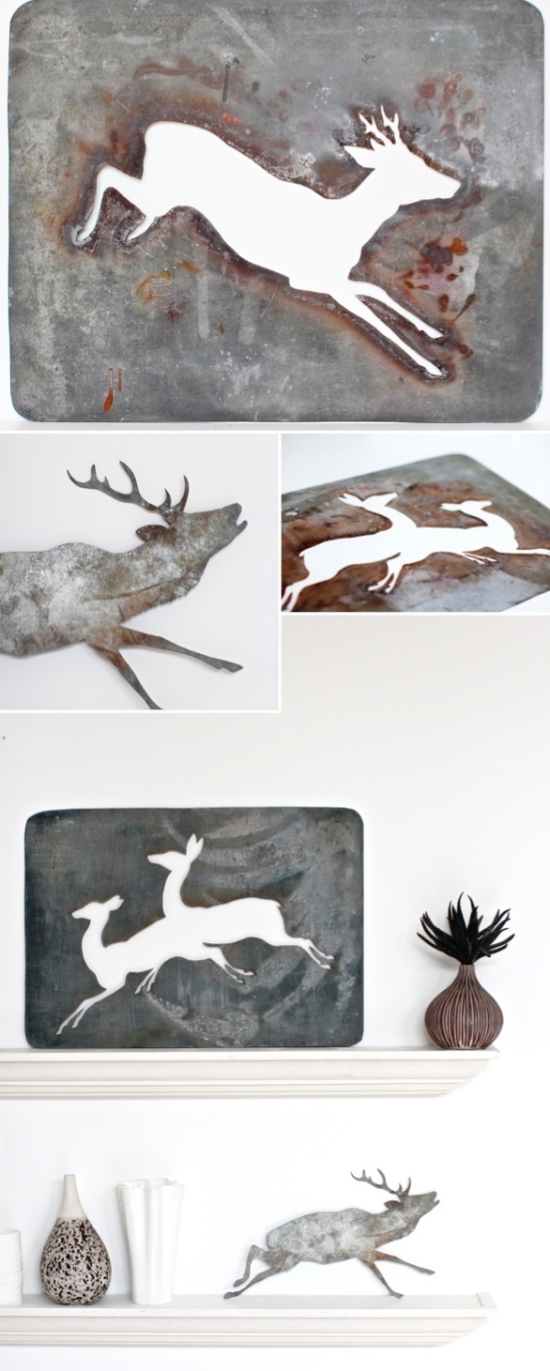
My unexpected find was a collection of huge 19th Century tin stencils of deer and stags – including the ‘inner’ cut-outs, which I love; I’m thinking the inner pieces will look beautiful resting on shelves and mantels at Christmastime, whereas I might actually put the stencils themselves to use to decorate tablecloths and fabric placemats (watch this space…).

19thC Stencils

I’ve been searching for a while for some little copper pans to use when serving individual puddings or sauces, and at last found these 9cm Mauviel pans which polished up beautifully; I’m picturing hot chocolate fondants with liquid centres, dusted with icing sugar… mmm.

brocante copper pans

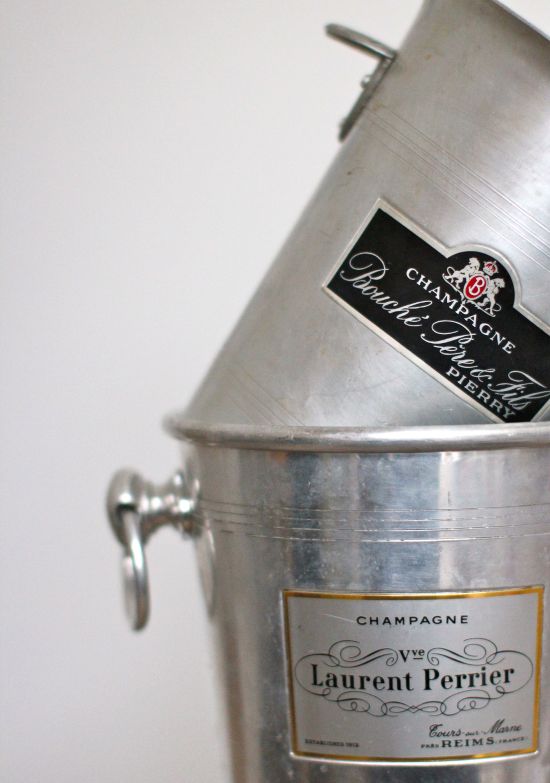
These champagne buckets below will add to one I have already and look good in a row at parties filled with ice & different bottles (wines, beers, soft..); I’m imagining them on my cart once I get around to restoring it…at 2 for £10 it seemed worth it even if they’re only used a handful of times a year.

old champagne buckets

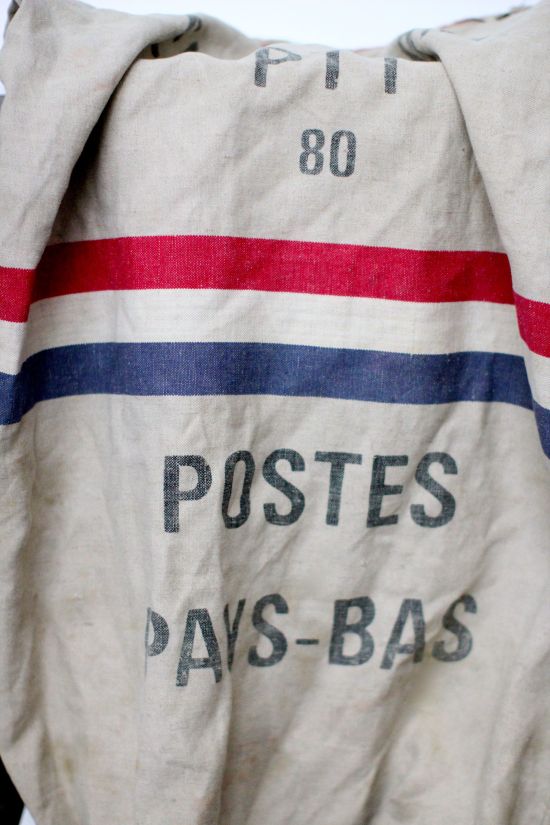
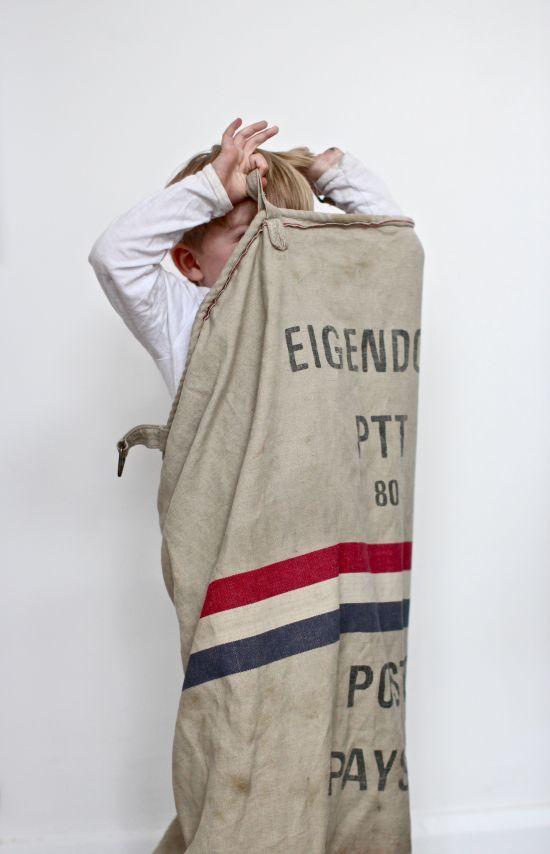
My next purchase was another surprise find; four vintage postal sacks (Belgian or Dutch, I think), which Harry immediately decided would be brilliant for a sack race (and how right he is..).  Once the summer is over I’ll give them a good clean and may turn them into over-sized lounging pillows or even hang them up in a row as laundry bags – though it could be weeks before we manage to fill them up.  What would you do with these?  They’re incredibly strong and well-made, and the years have made them very soft too… I’m sure there are a myriad of uses for them.

vintage postal sack

sack races

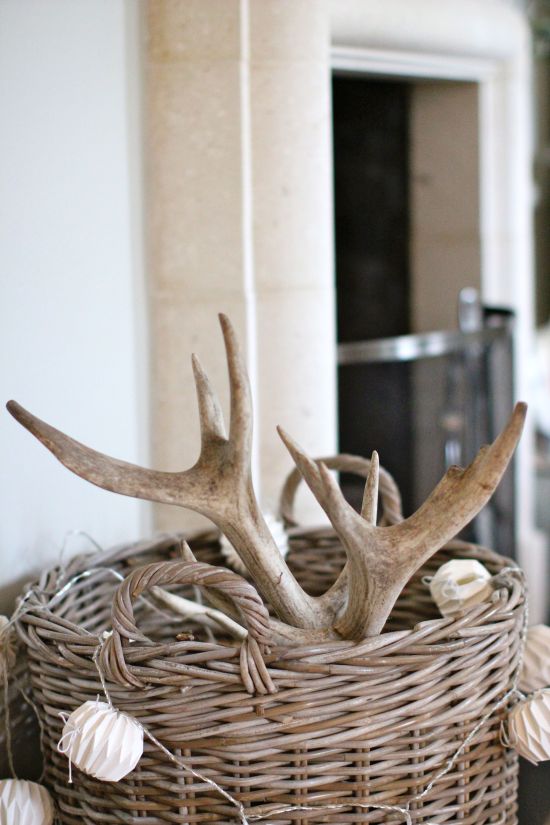
And finally, a pile of naturally-shed antlers to decoratively fill our kitchen fireplace out of season, sold by a charismatic, ancient Scotsman who collects them from across the moors.   If you come across antlers and like the look of them as decor accents, check that the ends are rounded and unmarked, which will indicate that they’ve been naturally shed during the spring  – hence their prevalence now.

deer antlers in fireplace

Large antlers and giant tin stencils may indeed be great finds, but they are somewhat hard to manoeuvre safely through crowds, so after inadvertently poking several bystanders we decided to head for home with our boot-load of treasure…. at least until the next year.

Are you a dedicated junk-hunter?  I’ve always had a passion for old, reclaimed objects and materials, and now our very old, unusual home gives us the perfect blank canvas for them.  Our last house was a minimal, modern space  – equally lovely but completely different, and much less suited to battered and worn furnishings.  How lovely to have an excuse now…

Have a great weekend, wherever you are and whatever you are doing!

vintage tin stag form

Neon for Grown-Ups

DIY neon candles

If you had to pick a handful of major recent design trends, there’s a good chance that neon and ombré, graduated colour would be amongst them.  (Did you think you’d clicked on the wrong blog for a moment there?  Some super-hip, of-the-moment edgy site?  Fear not; I maybe commenting on design trends, but reassuringly at least a year after everyone else has done so…).

Despite having lived through it – just – in the late 80s, I find myself seduced by the re-emergence of neon pink.  Also a bit alarmed, as mostly it seems to appear in micro-skirts, glow-in-the-dark lipstick and bra tops, none of which are complemented by having a toddler swinging from your arm and a weekly shopping list in hand.

So here’s a dash of neon for grown-ups; DIY ombré neon candles, which glow beautifully as the evening light fades and dusk falls across your summer dining table.  These exhibit just the right amount of bling, without causing conversation to falter or attracting lost hikers out of the forest.  Best of all?  They’re really easy to make..

DIY ombre neon candles

Take a handful of plain white candles and some cotton wool balls, and source a bottle of neon pink water-based acrylic paint.  I used the DecoArt brand below, but any acrylic paint which is water-based should be fine for use with candles.  (Avoid the temptation to use neon aerosol spray paint; it tends to be highly flammable, so unless you are prepared to blow out your candle as it burns down towards the colour, you might be inviting more pyrotechnic explosions than you had anticipated..)

DIY neon candle tutorial

Use a paintbrush to apply the colour from the base of the candles, and then blur it using a cotton wool ball to create a soft ombré tapering effect around the midpoint of the candle.  A circular buffing motion will create the effect shown above.  In order to do this, I simply stuck my candles upside down in a candle holder to keep them steady whilst I worked.

Neon candles tutorial

The paint dries very quickly and you’re good to go… dim the lights, light the candles and prepare for some ‘oohs’ and ‘ahhs’.  These would also look great in banded stripes (simply mark off with masking tape and paint chunky stripes 1 inch apart), and in a myriad of more subtle colours for those who shudder at the thought of neon*.

*Quietly I applaud you for your good taste; I just can’t help but love it…

Think Pink: Painted Bottle Vases

painted glass bottle vase DIY

I was looking for a way to quickly brighten up our summer dining table yesterday, and this super-quick DIY was born, using leftover paint samples to decorate glasses and vases to fill with garden blooms.  I used water-based emulsion paint, roughly mixed for a layered, ombre look.  I wanted a temporarily decoration that I could scrub off again later – if you want to create a permanent effect, just used oil-based paint and a primer.

I used Ensidig vases from IKEA; cheap as chips at just £1 each, and a lovely clean, simple shape like a retro milk bottle.

painted glass milk bottles

To make these, simple clean and dry your glass (drinking glasses work really well, as do all kinds of jars and bottles). Roughly mix up your paints – in my case a rosy pink and pure white, and use masking tape to define the area you want to paint.

water-based vase painting

Layer on your paint, then use your brush or finger to blend to create the look that you want (using one colour looks great too).

painted milk bottle vases tutorial

Peel off the tape when the paint has dried, and you’re ready to go… I added a tag to one of mine ready for Grandma’s bedside table when she comes to visit (quite a large tag, to accommodate Harry’s fledgling letter formation!)

DIY vase for grandma

A set of these would look great in rainbow colours down the centre of a table (use water-based acrylic paints from a craft store for vibrant colours), or even with stencilled initials or motifs. Handle the finished vases gently; splashes of water won’t cause any harm, but they’ll be vulnerable to scratches and knocks.  To remove your paint afterwards, just scrub in warm soapy water.

And finally; four minutes of magic for today;

I’m a huge fan of TED talks, but somehow had never come across this one by the incredibly talented spoken-word poet Sarah Kay, who talks to her as-yet-unconceived daughter about how to be brave in this world.

It’s four intense, passionate, fevered minutes of oratory (the whole talk is worth listening too, but at least the first 4minutes..), and for me it captured all of the things we want our children to know from the moment we first hold them; the mistakes we know that they will have to make,  the things we know they won’t believe until they see for themselves … and most fundamentally of all, the one message that we hope above all to instill; that there’s someone in your corner no matter how tough it gets, and that your port in the storm will always be here. With us. Whatever life brings.

Enjoy.